Have you ever wondered if Tesla’s state-of-the-art navigation system is too complex for everyday use? Or perhaps you’re worried about juggling your phone’s GPS while also keeping an eye on your battery levels and the road? Here’s a surprise: learning Tesla’s built-in navigation is easier than you think. It can make your drive fun and stress-free. You’ll never want to stop using it. In this guide, we’ll walk you through every step, from the first moment you tap the touchscreen to the advanced settings that help you save time and battery on longer trips.
By the end, you’ll be able to confidently plot routes, voice-command your car to drive anywhere, and customize your map to perfectly match your preferences.

Try MileageWise for free for 14 days. No credit card required!
Dashboard
Table of Contents
What do you think the future of driving will be like? It’s likely to be easy and high-tech, just like Tesla’s navigation system. If you’re new to electric vehicles, you might wonder if this tech is useful every day. But, Tesla’s navigation is easy to use and helps you find your way, including charging stops and traffic updates.
This article will guide you through using the Tesla navigation system, even if you’re new. We’ll cover the basics of the touchscreen, from searching for places to using voice commands. You’ll learn how to set up shortcuts for your daily commute.
But there’s more. Tesla has features like “Hungry” and “Lucky” for spontaneous moments. You can also drop a pin on the map for any location. These features help with everyday travel, from errands to weekend trips.
We’ll also talk about hidden features, like adding stops or editing trips. You’ll learn how to use Premium Connectivity for extra features. Even without Premium, there’s still a lot you can do with Tesla’s standard map.
By the end, you’ll know a lot about Tesla’s navigation. Our goal is to help you use it to its fullest, whether for a short drive or a long trip. Ready to start? Let’s explore the navigation interface and make your Tesla experience better.
Understanding Tesla’s Navigation System Interface
When you first get in your Tesla, you’ll notice the big touchscreen. This is your main control center. The navigation bar at the top or bottom is where the magic starts. Tapping on the search bar labeled “Navigate” opens up a world of possibilities.
Navigation System Main Menu
You can type in an address, search for a point of interest, or choose from saved shortcuts. These shortcuts are great for daily commutes or regular errands. You won’t have to type the same address over and over.
The interface is powerful because it works well with different inputs. Want to save time? Use voice commands. Pressing the right scroll wheel on your steering wheel lets you say, “Navigate to the grocery store.”
The system then shows you nearby stores, and you just choose one. This means you don’t have to use the on-screen keyboard while driving. Need a specific destination? Just type the street name or area, and Tesla will find the best match.
Tesla’s Fun Features
There are also fun features in the interface. You can tap “Hungry” for a random restaurant or “Lucky” for a surprise attraction. These features make your journey more exciting by suggesting new experiences.
There’s a cool trick to drop a pin on the map by long-pressing. If you see a beautiful lake but don’t know its name, just hold your finger on it. Tesla will set it as your next stop right away.
This trick is a time-saver. It’s useful when you see a place you want to go but don’t know its address.
Tesla’s navigation is simple. You can say, type, or tap to set your destination. There are many ways to make your drive better. Let’s explore more features, like voice commands and hidden gems.
Essential Tesla Navigation System Features
Imagine you’re going out and need to set your route.
1. You can just say: “Navigate to Meyer on Norton Avenue.” Your Tesla will do the rest. Voice commands make driving safer and more convenient.
2. You can even skip steps by saying the store name and street. This is great for areas with many stores. It saves time and reduces on-screen confirmations.
3. Adding stops is another great feature. You can plan to pick up groceries, drop off a package, and meet a friend. Just tap the three-dot icon to add stops. You can edit your trip later without starting over.
4. The “Hungry” and “Lucky” buttons make your Tesla an adventure machine. “Hungry” finds a local restaurant, and “Lucky” suggests a random attraction. Just one tap can take you to a new place.
5. Tesla also integrates with your calendar. It can route you to your next event automatically. This is perfect for busy people who have meetings all day. You can turn this feature on or off in the settings.
Tesla’s navigation focuses on making things easy and safe. Voice commands and shortcuts keep your eyes on the road. Advanced features help you plan your route better. Let’s explore more ways to customize your Tesla’s map.
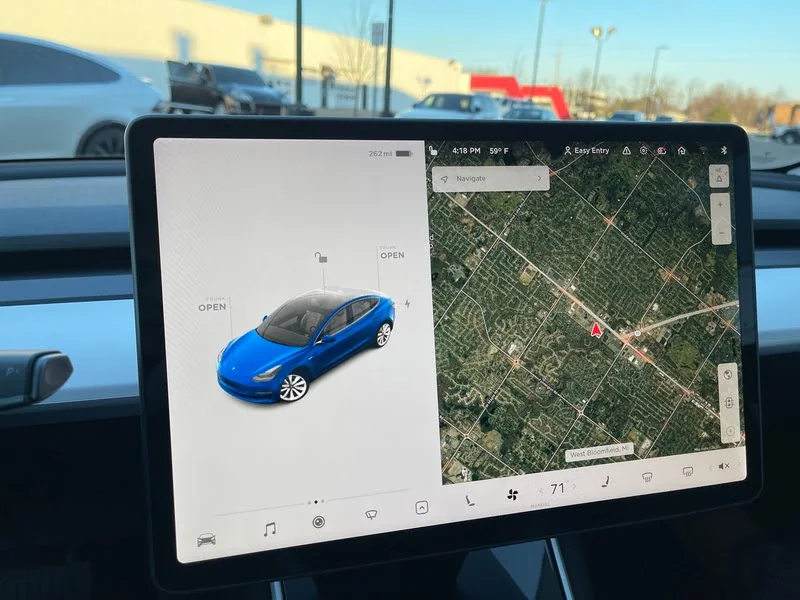
Customizing Your Map Settings
Customizing your map is easy and fun. At the top right, you’ll find icons for changing your map. One icon looks like a globe. Tapping it switches between map and satellite views.
- With Tesla’s Premium Connectivity, you get a bird’s-eye view. You’ll see buildings, parking lots, and greenery. This view helps you find parking or building entrances.
- Another icon is a traffic light. It shows live traffic data. Green lines mean smooth traffic, yellow for slow, and red for heavy traffic. It helps you choose the best route or time to leave.
- Points of Interest (POI) icons can also be turned on or off. With POI on, you see landmarks and attractions. Turn it off for a simpler map. This is great for finding places in new areas.
- Charging stations are key for electric vehicle owners. The charging station icon shows nearby Tesla Superchargers. It’s perfect for long trips or unknown areas. You can easily pick a charger as your destination.
- Tesla offers three map orientations: car-facing, full-route, and north-up. You can switch them by tapping a compass icon. This lets you customize your map to your liking.
These layers add depth to your drive. You can check traffic, find places, or locate chargers easily. Next, we’ll look at advanced settings and the Trip Planner.
Advanced Settings and Trip Planner
Now, let’s explore advanced navigation settings and the Trip Planner. These features make driving better by automating tasks. The Trip Planner is key for long trips.
- When you set a long destination, Tesla plans your stops. It figures out where to charge and how long to stay. This is vital for EV trips, making your drive smooth.
- “Online Routing” is a feature that surprises many. It uses real-time traffic data to find the best route. It even considers roadwork and traffic jams.
- If you want to save time, you can adjust the reroute threshold. For example, you can set it to save at least five minutes before changing the route. This way, if a route is two minutes faster, it won’t interrupt you. But if it’s five minutes or more, you’ll get a prompt to switch.
- There are also options like “Avoid Ferries” and “Avoid Toll Roads.” If you don’t mind tolls, leave these off. But if you’re watching your budget, turn them on to avoid them. In cities, “Use HOV Lanes” might appear, letting you use carpool lanes if you meet the requirements.
- Adjusting the navigation volume is important. If voice guidance is too loud, you can reduce the volume or mute it. Tesla can also take you to your next event or usual places. But you can turn this off if it’s too much.
By exploring these options, you’re not just getting directions. You’re customizing how your Tesla interacts with the world. Say goodbye to toll roads and congested highways. Every trip becomes more efficient and under your control.
Using Tesla Data to Get Mileage Deduction Or Reimbursements
Try MileageWise Web Dashboard for free for 14 days. No credit card required!
Dashboard
Now, let’s summarize what you’ve learned. We’ll also give you some takeaways and a checklist to help you.
Wrapping Up
Starting your journey is easy with Tesla’s car navigation system. Just type in your destination and customize your trip. We looked at how to quickly start a route and add stops.
Customizing your map makes driving better. With Premium Connectivity, you get satellite views and live traffic updates. This helps you avoid traffic and find cool places.
The advanced settings are the best part. Tesla’s Trip Planner keeps you from running out of battery. You can also plan your charging stops and avoid tolls. This lets you control your route and save time.
Exploring these features shows Tesla’s navigation is all about the journey. It keeps getting better with updates. Tailor your settings to make it feel like it was made just for you.
Ready to improve your drives? Subscribe to our newsletter for Tesla tips. Stay updated with new features and guides that make driving easy!
Key Takeaways
- Voice Commands: Use the right scroll wheel to instantly set your route without typing.
- Add Stops Anytime: Tap the three dots on your navigation screen to insert extra destinations.
- Map Layers: Switch on satellite, live traffic, or POIs for a more detailed, engaging map.
- Trip Planner Power: Rely on Tesla’s automated route planning for confident long-distance travel.
- Advanced Settings: Fine-tune your ride by avoiding tolls, ferries, or using HOV lanes for faster commutes.
Don’t Miss Out: Ready to put these tips into action? Click here to join our exclusive Tesla Driving Community and unlock even more expert insights for an effortless, enjoyable drive every time!
Actionable Step-by-Step Checklist
Category 1: Getting Comfortable with the Interface
Task 1: Locate Navigation Bar
- Step 1: Sit in your Tesla and power it on.
- Step 2: Look at the center touchscreen and find the “Navigate” search bar.
- Step 3: Tap the search bar to open your navigation options.
Task 2: Practice Voice Commands
- Step 1: Press the right scroll wheel on your steering wheel.
- Step 2: Say, “Navigate to [destination].”
- Step 3: Observe how the system displays nearby matches and choose one.
Category 2: Mastering Key Features
Task 1: Add a Stop
- Step 1: Start navigation to any destination.
- Step 2: Tap the three dots (…)
- Step 3: Select “Add Stop” to include an extra destination.
Task 2: Use “Hungry” or “Lucky”
- Step 1: Go to the main navigation screen.
- Step 2: Tap “Hungry” or “Lucky.”
- Step 3: Let Tesla direct you to a random eatery or attraction.
Category 3: Customize Your Map
Task 1: Toggle Satellite View
- Step 1: Look for the globe icon on your map screen.
- Step 2: Tap it to switch between standard and satellite views.
- Step 3: Enjoy the overhead imagery of your route.
Task 2: Enable Live Traffic (Premium Connectivity)
- Step 1: Tap the traffic light icon on your screen.
- Step 2: Notice the color-coded lines indicating traffic flow.
- Step 3: Decide if you want to reroute based on congestion levels.
Category 4: Dive into Advanced Settings
Task 1: Adjust Reroute Threshold
- Step 1: Tap on the three dots and select “Settings.”
- Step 2: Find the “Online Routing” or “Reroute” option.
- Step 3: Set how many minutes of time you want to save before triggering a reroute.
Task 2: Customize Trip Planner
- Step 1: Enter a long-distance destination.
- Step 2: Observe the recommended charging stops.
- Step 3: Toggle avoid ferries or toll roads if necessary.
Category 5: Using Tesla Data For Tax Benefits
- Step 1: Start using the Tessie app to be able to export Navigational data
- Step 2: Import your data to MileageWise’s web dashboard
- Step 3: Export your IRS proof mileage logs for maximum tax deduction or mileage reimbursement.
For more details on charging stops and trip planning, visit the Tesla’s Official Support Page on Navigation. It has lots of info on managing your battery and making travel smooth.
FAQ
What is the Tesla Navigation System and how does it work?
The Tesla navigation system is an advanced navigation system designed specifically for Tesla vehicles, including the Model 3. It utilizes Tesla’s proprietary software integrated with Google Maps to provide real-time routing and navigation instructions. The system allows users to input a destination and receive turn-by-turn directions, estimated travel times, and alternate routes. Moreover, it considers traffic conditions and can predict travel times based on real-time data.
How can I set a destination using the Tesla Map?
To set a destination using the Tesla map, simply tap the icon on the touchscreen that resembles a map. Then, you can either type in your desired destination or use the voice command feature to dictate it. After selecting your destination, the system will provide a route overview along with estimated travel times. You can also save frequently visited locations as favorites for quick access in the future.
What features are included in the Tesla navigation settings?
The navigation settings in your Tesla allow you to customize your navigation experience. You can enable options like automatic navigation, which suggests routes based on your driving habits. Other features include the ability to select your preferred routes (e.g., faster or shorter), enable traffic alerts, and adjust settings for charging stops if you are on a long trip. Access these settings through the settings menu on the touchscreen.
How does Tesla's navigation handle charging needs during a trip?
The Tesla navigation system includes a dedicated trip planner that automatically identifies charging needs during long journeys. When you input a destination, the system will calculate the required charging stops along your route, ensuring you arrive at your destination without running out of battery. If charging is needed, it will display nearby chargers and provide estimates for how long you need to charge based on your current battery level and the distance to your destination.
Norbert Szabo
Similar Blog Posts

Tesla Navigation System Tutorial: Tips For Maximum Benefits
Have you ever wondered if Tesla’s state-of-the-art navigation system is too complex for everyday use? Or perhaps you’re worried about juggling your phone’s GPS while

How Many Vehicles Can a Business Write Off?
Understanding how many vehicles a business can write off is crucial for any entrepreneur looking to optimize their tax strategy. The IRS has clear rules

What Are the Rules for Writing Off a Car for Business?
When managing business expenses, many entrepreneurs often miss a big deduction. This deduction is the ability to write off a car for business. Understanding the

Should Car Allowance Be Included in Pensionable Earnings?
Many people wonder if car allowance should be included in pensionable earnings. This article will explore the impact of car allowances on pensions. We will

How Does Writing Off a Car for Business Work?
When it comes to managing business expenses, understanding how to write off a car for business purposes can be incredibly beneficial. This article will break

Car Allowance: The Ultimate Guide
Last updated: January 16, 2025 Managing work-related travel expenses is a significant concern for many employees and employers alike. One common solution is the car
| MileageWise | Other Mileage Tracker Apps | Other GPS Based Trackers | Excel | Tax Professional | |
| Mobile App for Ongoing Tracking | |||||
| Web Dashboard to Manage Trips | |||||
| Imports Trips and Locations from Google Timeline | |||||
| Lifetime Deals Available | |||||
| Average Reported Business Mileage Deduction | $12,000 | $710-$8500 | $400-$5,700 | $200-$2,000 | |
| Average Time Creating Retrospective Mileage Log (Yearly) | 7 minutes | 180 minutes | 180 minutes | 180 minutes | N/A |
| AI Wizard Mileage Log Generator for Retroactive Mileage Recovery | |||||
| Produces IRS-Proof Mileage Logs | |||||
| Free Phone Support with Live Agent | |||||
| Mileage Log Preparation Service | |||||
| Data Accessible in the Cloud |


